
Cardboard "Greenish Sword" SAO IF
- Chris Lee

- Dec 28, 2018
- 7 min read
Updated: Nov 2, 2021
First off, I want to thank my mom for pushing me to write this blog!!! This is actually my first blog, please comment if you see any way I can improve.
I've always been fascinated by the many cool swords that exist only in video games. From my experience from making things with cardboard, I was pretty sure there would be a template for a cool cardboard sword out there online. Unfortunately, I couldn't find any designs that really popped out at me.
So I decided to make my own...
(If you'd like to make one, please feel free to do so, as I've included the template in this blog). Also, if you do happen to attempt to make one, please share pictures of it in the comments!

Finding a Design
The first thing I needed to do was to find a design to base my sword off of. This picture is a screenshot of a mobile game called SAO Integral Factor. Although this sword is for low level players, I chose it because it was elegant enough, but not too extravagant.
Modeling the Sword in CAD
The next step on my list was to recreate it in Fusion 360 which is a 3D design software by Autodesk. I drew most of the lines off of an unfortunately blurry image of the sword. My plan was to later use another software to "unfold" the model. The video on the right shows a quick time-lapse like run-through. The images below are screenshots of the completed sword in Fusion360.


"Unfolding" the Model
I used the 3D model unfolding software called Pepakura. It was actually a software I found a few months ago, but I didn't really have any good use for it until this project. As you can see, the model is unfolded from a three dimensional object into a flat drawing that can be printed out on a few pieces of paper and later folded together. I scaled the size of the original design up, to 800 millimeters in length, 35 millimeters in height, and 196 millimeters in width. You can download my template here.

Making the Stencils
I started by printing the template out on 6 pieces of Letter sized paper. I then trimmed and tapped the pieces of paper together where they were separated by the different sheets of paper. Once I was sure that all the parts were lined up perfectly, I began to cut them out.


Beginning to Craft the Blade
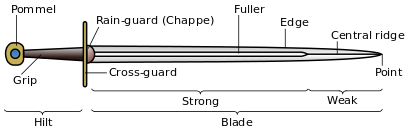
The next step was to trace the templates onto cardboard and cut them out. I decided to start with the blade, which was by far the most difficult, and at the same time, the part that would majorly dominate the outward appearance of the sword. I actually cut my paper stencils of the blade into smaller parts, because the cardboard that I had was too small to fully encompass it. The blade of this design has two parts: the edge and the flat, fuller like portion (shown in the anatomy diagram). Once I cut all the parts of the blade out, I glued each parts of the halves together, but not the halves themselves. Personally I used hot glue, but superglue should also work nicely.


Strengthening the Blade
The blade of my sword design was pretty long and thin, so I made a support structure with these jumbo popsicle sticks. My designed template perfectly allowed the thickness of three of the jumbo popsicle sticks to fit within the thickness of the blade. I used two sticks side by side on the first layer, a single stick in the second layer, and to close the other side up, another two sticks together adjacently. I used hot glue for these sticks as well, but superglue and wood glue will work too.

Making the Cross-guard, Rain-guard, and Grip
The cross-guard was simple enough. I took the main portion from the template and approximated the two rounded out sections at the top. I used hot glue to assemble the cross-guard parts. For the rain-guard, I did not follow the overly convoluted pattern that Pepakura unfolded. Instead I just used the triangular shape that the software generated, and extended it a little so that there would be an insert to attach to the inside of the cross-guard. At the same time, I also added the curved edges of the bottom part of the blade with hot glue. As for the grip, I didn't really have a plan until my dad found an irrigation pipe for a sprinkler system that was not being used. It worked out really well as a substitute for rolled up card board for a handle instead. I made a hole the size of the pipe on the bottom side of the cardboard, and superglued the two parts together. Afterwards, I took the grip embellishing piece, and glued that with hot glue to the bottom of the cross-guard.

Hardening the Cardboard
This step was the most tedious for me, because of all the waiting that was required. I used PVA glue and water solutions to basically harden and then create a laminated surface on the cardboard. I found specific instructions with the ratios of PVA and water for the solid durability I needed here (I claim no credit to this method. All the credit goes to the person who created this ehow). I put coats of the solution around all the areas of the sword that were exposed to the outside, and limited coats on the inside of the sword. While it was drying, I made sure to put some rubber bands around the blade to keep the glue solution from deforming it the wrong way. At the same time, it ensures that the two halves harden to fit each other. As for the cardboard of the cross-guard, I didn't use rubber bands during the drying process. The only important thing to note, is to make sure the cardboard completely dries before the next coat is applied.


Making the Connector for the Blade and Grip
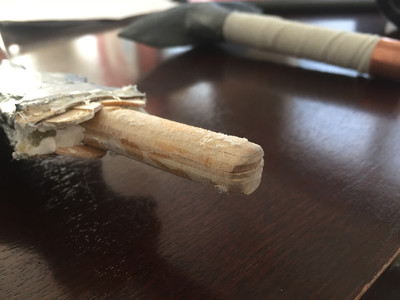
This step was one that took me a long time to think about, but I ended up coming up with a pretty good solution. The problem was that after I glued the two halves of the blade together with the jumbo popsicle stick support I had inside, there was no way to securely connect the blade with the cross-guard/grip. Since the inside of the cross guard exposed the pipe I was using for the handle, I decided to make a wooden dowel (I didn't have one available) that would fit into the pipe inside the cross-guard. I used wood glue to glue 7 jumbo sticks together. Once it dried, I filed and sanded it down to fit about 4 and 1/2 centimeters deep into the pipe. Afterwards, I cut the filed stack of jumbo popsicle sticks in half and used a knife to whittle one side into a chisel like shape. This shape would then fit in-between the outer layers of my jumbo popsicle stick blade support. Before gluing it in, I soaked the end that was going to "clamp" the chisel-insert in hot water, and let it dry around it's shape overnight. On the next day I used super glue to secure the chisel shape to the inside of my blade support. It ended up cracking a little (you can see in the picture), as I did rush the drying process a little.

Finishing the Blade
Even though the inside of the blade was supported by the jumbo popsicle, the empty space between the cardboard and the wooden sticks can cause the blade to lose it's rigidity. I decided to strengthen the inside of the blade with a sealant material called caulking. First, I superglued together one side of the blade. I then put in the blade support piece and started pumping in the caulking into the blade. If you are building this project, you can use other fillers, but I just had caulking lying around, so I decided to use it. I started from the tip of the blade and went down while filling the interior with caulking and the same time super gluing it in place. I used binder clips to assist the gluing and drying process.
Connecting the Blade to the
Cross-guard and Grip


Reduction of Ugly Creases and Rough Edges
After the hardening process, there were some corrugations in the cardboard that were showing. I used Gesso to smoothen them. Gesso is basically thickened white acrylic paint. It's good as a primer to help paint stick. Before applying the Gesso, I started by picking off the excess glue residue left on the cardboard parts. Next I used a normal paint brush to apply gesso to all the areas where there was cardboard exposed. I thickened the amount of gesso at the parts where there were dents. Once the gesso dried, I sanded it to make it smooth. I repeated this whole process two more times, leaving the sword with a much smoother surface than before.


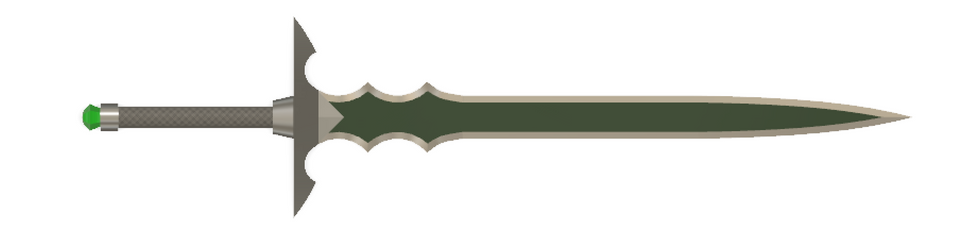
Painting
Since the sword was from an already existing game, I decided to follow the color scheme that it was originally designed with: green and silver. I used Artist's Loft's Metallic Acrylic Paint that I had leftover from previous projects. For the edge of the blade I mixed in a little metallic black with the silver to make the silver color darker. For the flat part of the blade I mixed a very dark green with a lot of black. For the cross-guard, I just added a little more black to the original silver mixture I had and used that, so it wouldn't look the exact same color as the edge of the blade.

Completing the Grip and Adding the Pommel
This sword had an old fabric like grip, so I decided to use a strip of an old t-shirt to imitate that. I cut around the waist of the t-shirt with a width of 2 centimeters, and wraped it like a tennis racket grip around the pipe I used for the handle. For the pommel, I used a copper hot water pipe cap to fit around the pipe. It also helped to hold the t-shirt grip in place. If you are making this at home, of course you don't have to follow exactly what I did, just be flexible enough to work with different materials.
If you read this far, I'd like to say a big thank you, as I spent a lot of time working on this post and the sword itself. Don't forget to comment what you think and share pictures of your own sword down below!


Comments